Pages

Tuesday, January 24, 2012

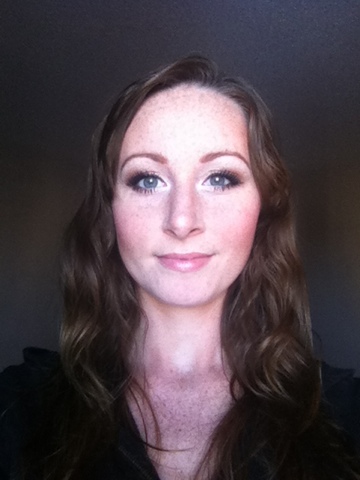
Smokey purple eye makeup video


Some makeup I used:

Medium shade -light pink from Wet and Wild set Lust with Lise Watier Folie D'opale on top
Dark shade -Bourjois 17 Prune intense
Highlight inner corner -white eye pencil with a light ivory shadow on top
Highlight under brow -light ivory shadow
Eyeliner -Maybelline eyestudio creme liner blackest black
Foundation -The Body Shop All in one face base 05 (favorite powder foundation because it's all one step and can be used as concealer too with a slightly damp sponge)
Bronzer -Rimmel sun shimmer bronzing compact medium shimmer
Blush -Lise Watier blush-on powder Libertine

Tuesday, January 10, 2012

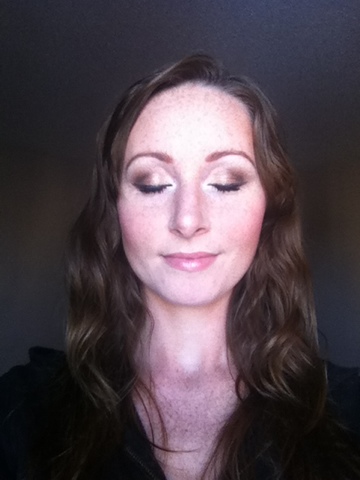
Gold, copper smokey eye makeup

Here is a look that isn't too dramatic but also not boring :)
For the eyes:
First I used an eye shadow primer so the shadow will show up better and stay in place way longer. Next I used the light gold from the CG trio on the inner third of the eye on top and bottom, the medium copper blending with the gold and in the middle of the eye on top and bottom, and the darkest shade in that trio on the outer corner top and bottom and blended into the crease. If you would like to make it a little more dramatic or darker it is good to blend a bit of darker brown or black on the outer corner and crease as well. After the shadow I used a white eye liner on the inner corner and put a very light shadow over top to blend it and also blended that shadow under my brow and made sure that it blended with the darker shadow. Next i put black cream liner on top lid along lash line and put black shadow along the edge of it to make it look smokier and to help it set better. After that you just need to curl lashes and put mascara on and eyes are done.
For the face:
The face is quick and simple, the eyes are pretty easy but the face is even quicker! All I did was put on my face powder, bronzer, and blush.

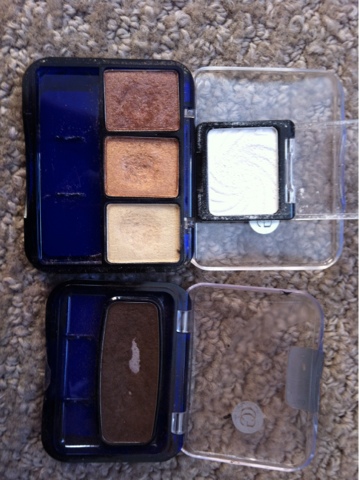
Here is the makeup I used:
•Eyeshadow base- Wet n Wild-ESB02 pearl
•Trio set- CoverGirl eye enhancers-115 Gold sunset
•Dark brown- CoverGirl-Brown smolder
•Highlight- Wet n Wild-Sugar
•Cream liner- Maybelline eyestudio-blackest black
•Mascara- LancĂ´me-Hypnose + Revlon-Grow luscious waterproof blackest black
•Brows-1st- Rimmel brow pencil-02 Hazel, 2nd- Ardell brow powder-Mink brown. Then use brow brush to smooth out and look more natural. I find that using both helps it to stay in place much better.

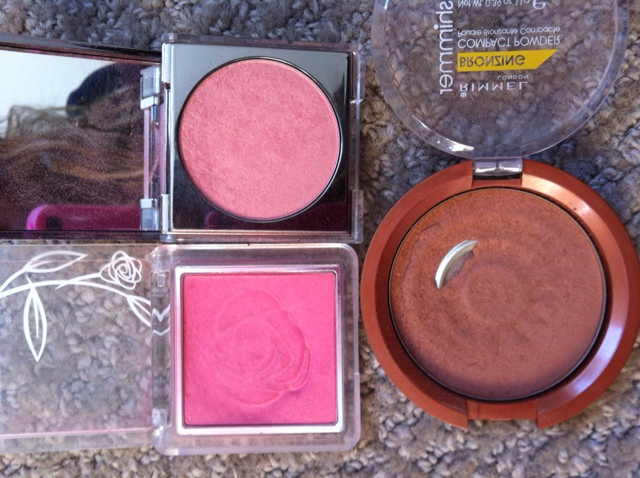
Face makeup:
•The Body Shop- All in one pressed powder 05
•Rimmel- sun shimmer bronzing powder-medium shimmer
•The Body Shop- roseflower blush 02
•Lise Watier- Libertine blush

Tuesday, April 19, 2011

Smokey gold eye makeup video


The makeup I used for eyes:


NYX -Eyeshadow base, pearl esb02
Wet and Wild -Vanity 249 set (medium and both dark shades)
Prestige -eyeliner, white (inner corner)
Covergirl -Snow blossom (inner corner)
Covergirl -Shimmering onyx (to shade edge of liner)
Maybelline -Eyestudio creme liner, blackest black (top liner)
Annabelle -Smoothliner waterproof, black (bottom and inner rim liner)
Revlon -grow luscious mascara, blackest black

For face:

Merle norman -luxiva purely mineral loose powder foundation L60
NYC -Sun 2 sun bronzing powder, terracotta tan
The Body Shop -roseflower blush 02

Wednesday, January 26, 2011

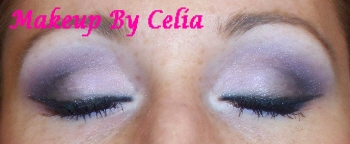
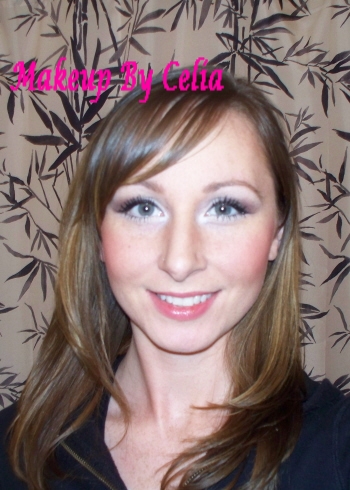
Purple smokey eyes -Wet n Wild kit -lust


In this look I used all cool tones to make sure everything blends together nicely. 
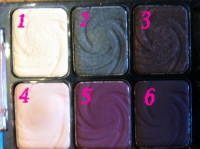
On my eyes I started with an eyeshadow base to make sure it will stay in place all day and to make the colours show up more too. Next I put the medium shade(4) on the inner three quarters of my eyelid, just up to and a little into the crease. Also put the medium(4) on the inner three quarters under the eye. For this look there are 2 dark shades I used, first I put the lighter one(5) on the outer corner and in the crease the put the colour in there and then I put the darker one(3) mainly on the outer corner to make it darker. Always remember to make sure to blend everything very well because it really doesnt turn out as well when you can see all the lines exactly. I also like to put a bit of liner just under the lash line on the bottom lashes and blend the dark shadows into that and the medium to make it all soft and smokey. If it looks too dark or goes too far in you can always wipe a little off and/or blend the medium into that again. Same goes for the top, if the dark gets too far on to the medium then just blend it away with more medium. Next you'll want to do your eye liner a little thicker on the outer corner and slanting up a bit and its good to take a small angle brush and put a small bit of black on the edge of your liner to make it look a little softer, dont make it any thicker on the inside though, you always want that to be a very thin line. Next you'll want to blend the highlight(1) under your brow and on the inner corner of your eye. Last step for your eyes is mascara and its always best to curl your lashes first and use a mascara that helps to make lashes thicker and longer.

Here is what I used:
Eyes:
Base-NYX~eyeshadow base pearl
Wet n wild set~lust c248...
Medium-4 (light pink)
Lighter dark-5 (purple)
Darker-3 (deep purple)
Highlight-1 (very light pink, almost white but not too white)
Liner-Maybelline~eyestudio creme liner with Covergirl~shimmering onyx shadow on the edge with small angle brush
Mascara: Revlon~Grow luscious (its my fav right now in waterproof and has been for a while) 

Lips: Light plum lip liner lining a bit outside my lips to make them look bigger and filling in my lips a little too so it doesnt look fake and then a light plum gloss on top and a bit of shimmer put just in the middle of my bottom lip to make it look even bigger.


Tuesday, January 11, 2011

Light retro look

Heres a look I did with kind of a retro look to it but it isn't too dramatic. First I put an eyeshadow primer on then I put the medium shade on the inner three quarters of my eyelids just up to the crease. Next I blend the dark shade on the outer corner and in the crease and make sure to blend the dark shade very well so you dont see the edges too harsh. Next I put black creme eye liner on, making it thicker on the outer corner and slanting up. I put a small bit of black shadow on the edge of the liner with a small angle brush just to make it a softer line. Under my brow and on the inner corner I put the highlight, it always brightens the eyes. Something different about this look is what I did under my bottom lashes, instead of a liner I put the medium shade all the way acoss the bottom and its quite a light shade so that brightens the eyes a lot and gives it quite a retro look. You can put primer under aswell to make sure it'll stay and show up more. Next I put on some lenghtening mascara and then thickening mascara to make my lashes really stand out. Hope everyone loves this look! I'll make another one of these for shading and highlighting the face very soon! 


Medium:Wet n Wild~set 249 vanity-light matte cream shade
Dark:Wet n Wild~set 249 vanity-dark bronze shade on outer corner and crease and the darker brown blended with it on the outer corner
Highlight:Under brow~ Cover girl-snowblossom, Inner corner~ White liner with Cover girl-snow blossom on top
Liner: Maybelline eyestudio -blackest black, black shadow

Friday, November 19, 2010

Arabic / Kim Kardashian double-winged liner eye makeup


Here is a dramatic Arabic look that I have seen pictures of Kim Kardasian wearing something like it and it would be great for a night out.
Always put the shadow base on first, all over top and thin line on bottom. Next put the medium shade on the inner three quarters of eyelid, just up to the crease and also thin line under eye on inner half. Next with a blender brush you put the dark brown in the crease and outer corner and make sure its very well blended. Then you take a white eye liner and put some on the inner corner of the eye this really brightens up the eye and really makes you look wide awake) and then take an ivory shadow and blend it into the white to make sure its very well blended, also then take the ivory and blend it under the eyebrow and itno the dark brown. Also to make it even more dramatic use a blender brush and put some black shadow n the outer corner.
 For the liner you make it very thin on the inner corner and then start making it thicker just after the pupil (different on different peoples eyes but usually around the same spot.) Make sure it slants up on the outer corner and put some white pencil liner under so that you will really see the two black lines separated. With a small angle brush blend black shadow on the edge of the liner so its not a harsh line. Under the eye put the same black liner right under the lash line from right under the pupil to just before the other line ends, never touching the other liner. With the dark brown shadow and a small angle brush blend the edge of the bottom liner so it doesnt look too harsh. On the outer corner of my eyes i used fake lashes, just on the outer corner though so it didnt look too fake.
Just like with all makeup looks, its always best to stay in the same colour family with all your makeup so nothing clashes. Since the shadows are all warm i made sure to keep my blush and lip gloss warm aswell. It would kind of clash if i used anything with a cooler tone, like something more purple.

Medium: Cream/beige colour
Crease: Cover Girl -Brown smolder, Cover Girl -Black
Highlight: Ivory
Liner: Maybelline creme liner blackest black


Monday, August 30, 2010

Light smokey eyes


In this look I used mostly all natural colours, the only one that wasn't really natural was the highlight on the inner corner and under the brow but you don't want that to look too fake under the brow so dont put it on too heavy there.
Heres the colours I used and where I used them:

Inner three quarters of eye lid up to crease: French vanilla
Outer quarter up to crease and in crease: Cappuccino
Just outer corner top: Black or dark grey
Outer corner on bottom: Thin line of waterproof black pencil liner in/just under lash line with Cappuccino shadow shaded on top
Inner half on bottom: French vanilla
Inner corner: White eye liner plus soft ivory highlight shadow over top to make it softer, or make the liner softer with a q-tip.
Under brow: Soft ivory highlight
Top liner: Make it thicker from the outer coloured part of your eye but make it get thicker gradually. Its nice to put a bit of black shadow on the edge of the liner with a small angle brush after to make it look like a softer line. Make sure the liner is very thin on the inner corner of the eye.
Brows: Soft brown pencil
Mascara: Black on top and bottom, plus fake lashes just on outer corner of eyes

Make sure your blush/bronzer doesn't go in any closer than a line drawn down from your pupil
Just under cheek bone and up to temple: Bronzer
Right along cheek bone but NOT on temple: Roseflower blush

Powder: merle norman mineral powder

Lips: Milk chocolate satin lip pencil

LinkWithin

Related Posts Plugin for WordPress, Blogger...