
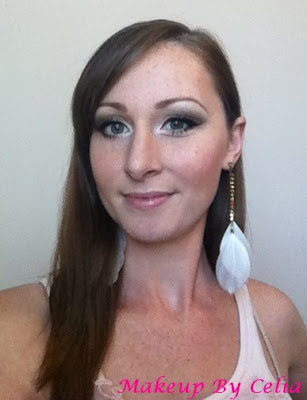
Here is my step by step guide to smokey golden eyes with Motives cosmetics :)

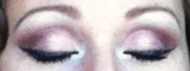
1) It's always best to start with a thin layer of eyeshadow primer all over the lid from lash line to eyebrow and a thin line under lower lash line. Next I put the medium shade, Motives eyeshadow in Pink gold, up into the crease a little higher to make the eyes appear larger. Also put a thin line under the eye from just inside inner corner to just inside outer corner (other shadows will fill in the inner and outer corner).
2) I put the dark shade, Motives eyeshadow in Hazelnut, a bit above the crease to keep the eye looking larger.
3) To make sure the eyes don’t look droopy, never let the shadow go past the line you see in picture 3. In the picture I have the brush past the line just so you can see the line better. Place a brush on side of nose and up to outer corner of eye, just a little past outer corner so you can connect a thin line of the dark shadow on bottom outer corner to the outer corner of crease. If needed, blend a bit more of the medium shade to where the dark shade starts under the eye.
4) With a blender brush put the highlight, Motives eyeshadow in Creme fresh, under the eyebrow and make sure it is blended well with the dark shadow. If it looks too harsh of a line and doesn't look blended well enough you can blend a bit of the medium shade where the highlight and dark meet, to make it look smoother and add a tiny bit more color. For this look I blended a lighter gold, Motives eyeshadow in Whipped cream, between highlight and dark. Also I used the lighter gold to blend the highlight on inner corner with the medium.
5) For the eyeliner, Motives Gel liner in Onyx, I used an angled liner brush to make a thin line from inner corner to just past pupil and then gradually make line thicker and slanted up. Where the shadow ends is a good guide to where the liner should slant up and end. Next, with a small angled shadow brush, put black shadow on and just on edge of gel liner to set it in place so it wont budge all day and to give it a smokier look. Also to make the look a little darker I blended a bit of that black shadow with the angle brush under outer corner. If you wanted to make it more dramatic you could also put a waterproof liner in waterline of eye, upper and lower. After liner I curl my lashes and put on lots of mascara, top and bottom! To make eyes even bigger I usually put fake lashes on outer third of eye, this makes the outer corner look more lifted and gives a cat eye effect. Didn’t put any on this time but usually do!
6) For the rest of the look I made sure to keep all of my makeup in warmer tones so that nothing will clash. It's always best to keep all of your makeup in the same color tones, if you mix warm and cool together it can make your makeup look way over done and not fitting together. Sometimes fun looks can be made with mixing colors but usually just for crazy night looks. :)
Thanks for coming to my page and checking out my posts! Please tell your friends and come back more to see lots of new posts coming up! :D 
List of makeup used:
Eyes:
- Medium shadow -Motives Pink gold + Motives Whipped cream
- Highlight shadow -Motives Creme fresh + Motives Whipped cream
- Dark shadow -Motives Hazelnut
- Liner -Motives Gel liner Onyx + Motives Onyx shadow
- Mascara -Motives mascara plus a couple other types (I layer a couple different mascaras most of the time)
Face:
- Primer -Motives Perfecting face primer
- Foundation -Motives Dual Perfection pressed powder -Neutral
- Bronzer -Motives Miami glow bronze
- Blush -Motives So Peachy


