Pages

Friday, March 15, 2013

My two favorite products! Plus a lighter smokey/defined crease look :)


 Here is another lighter smokey look with two new products I'll never go without! In these pics of my makeup I used both and makeup stayed allll day.

The Garnier Skin Renew B.B. Cream is amazing! I've been using it for a few months now and it's the best skin primer/moisturizer. I love it because it evens out skin tone so well and you dont need to wear much foundation with it. I just use this with a loose powder on top to keep my skin matte and to make my skin look more even. Even if you dont use foundation I think this would be great just as a morning moisturizer. Picture below.


Stay Dont Stray by Benefit is wonderful too! I just got this one about a week ago and I am so impressed with it. It is an eye primer that also works great as an under eye concealer. I have used a lot of other eye primers and this one is my favorite because of how well it makes your eye makeup really stay and how the color of it doesnt interfere with with your eyeshadows and change their color(I've had some primers that did that in the past). I also love how great of an under eye concealer it is! Just make sure to blend it out well and put powder on top. Picture below.


 P.S. Sorry about the messy hair in the pics, it just wasn't working out!

Hope everyone will try these out and love them! :D

Wednesday, March 13, 2013

Our dog :)

This is my dog Chaka, AKA "Meat head" (what my husband calls him) :) hehe


Natural cat eye makeup

Here is a very easy cat eye look. I usually wear this look when I have to get ready quick or just want more natural makeup.
 

1) First I put on my eyebrows and eye primer with a loose powder on top. Next I put my usual highlight on under my eyebrow and on the inner corner or my eye, I like to put that on before eyeliner so the highlight wont get on the liner and mess it up. Then I put my creme eyeliner on, thin on the inner corner and gradually let it get thicker on the outer half.
2) To set the liner and help it stay without getting on eyelid I use a dark shadow and a small angle brush. When going for a more dramatic look I use a black shadow and for a lighter look like this, I used a dark brown shadow. I like the shadow over the liner a lot because it helps give it a little bit of a smokey look and makes the liner look less fake and harsh.
3) I thought I should show a couple different angles so it is easy to see where I put the liner, hope that helps!
4) For the mascara I always use more than one because I find I can get sooo much more volume this way, just be careful not to use mascaras that clump a lot. Lately I have really liked using Grow luscious by Revlon after curling my lashes, then Clump Crusher by Covergirl, and then Lashblast 24hr by Covergirl. Only the last one is waterproof to help lashes stay curled and not run if eyes water, the first two are not waterproof though because waterproof mascara can really dry out lashes and make them brittle.

Hope you all like this and try it out for a quick and easy cat eye look! :D

Tuesday, March 12, 2013

Step by step smokey/defined crease eye makeup


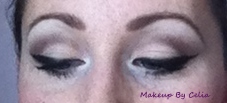
Here are a few pictures to show some steps for doing a light defined crease/smokey eye.

1) In the first picture I already have the medium shade on the inner three quarters of the eye just up to the crease and a thin line of the medium shade under the eye on the inner half. Next I put the dark shade on the outer corner and blended into the crease and also put a thin line of it under the eye on outer corner. After that I used a white eyeliner pencil to brighten the inner corner and used a good blending brush to put light shadow over the white liner to blend it more and under brow to brighten the eye.
2)I used a creme liner and made sure not to let it go too far down because that can make the eye look like its sagging. It is good to make sure the line is thin on the inner corner and gradually make it thicker on the outer corner to give more of a cat eye look.
3) With a small angle brush I put some black liner on top of the gel liner and just on the edge of it to set the liner well so it wont budge and to give it a little bit of a smokier look.
4) Before I put mascara on I ALWAYS curl my lashes! To give my lashes the most volume I also always use more than one mascara. I like to use one that is good for growing my lashes first, then a good one for thickening and lengthening, and then one that separates the lashes well and is also waterproof so the mascara will stay on better. If I go swimming I will use all waterproof but if not swimming its better to only use waterproof mascara as a top coat because it can really dry out lashes and be very difficult to take off.
5) This picture is the final look, not too dramatic but really makes my eyes look a lot more noticable. Also, I had brow pencil on already for the first picture but I put a brow powder on after and brushed it out to help set the brows and make sure it'll stay on all day.
6) Here is the eye makeup I used:
    Medium: Rimmel Stars-159 Frivolity
    Dark: Merle Norman Luxiva Lasting Eyecolor-Bordeaux
    Highlight: NYC City Duet Eyeshadow-White
    Liner: Loreal Infalible Laquer Liner 24hr-171 Blackest Black + the black shadow from the NYC City Duet eyeshadow on top
    Mascara: First coat~Revlon Grow Luscious plumping-Black, second coat~Covergirl Clump Crusher-very black, third coat~Covergirl lashblast 24hr-very black
    Brows: Rimmel brow pencil-002 Hazel + Essence eyebrow stylist set-dark brown

Monday, March 11, 2013

Kitten smiles


This is my kitten, Biggie Smalls :) 
In an earlier post I have a picture of him helping me in my makeup room and thought I should put another pic up to show how big he is now and hopefully his big sleepy smile will make everyone who sees my blog smile too! :D 

P.s. I will be doing a bunch of posts soon(finally!) Husband is using the computer right now though so I'm just using my Iphone for now and I'll do better computer posts very soon! 


Makeup Station/desk :)


Here is my makeup station/desk that I use everyday to do my makeup :)
I have a couple office supply boxes that I use to organize my makeup and I think those help a lot. When my makeup is all stuffed in my big kit(makeup tool box) I can never find anything so I started organizing things in different boxes so I can know where everything is a lot easier. I still have to use my big makeup tool box for makeup appointments away from home but its easy to organize that before going somewhere and put things back in place when I get home. Also, I have a lot of doubles so I can just keep a bunch of things in my tool box.
Well this is just a quick post to show you how I organize my makeup station, haha it may look unorganized but everything has a place and its very easy for me to find things set up this way. I also have a couple drawers under the black shelf/desk for foundation, bronzer, blush, and makeup brushes and tools.
Hope you all like my set up and I hope you're all having a wonderful day! :) 


LinkWithin

Related Posts Plugin for WordPress, Blogger...